Most of us are well-versed with the interface of Windows. But when it comes to Mac, the operation bewilders us all. Similarly, taking a screenshot is super easy in Windows, but Mac becomes a little trickier as it lacks the PrintScreen command, which is found in Windows. In such a case, a lot of people might question how to screenshot on Mac?
However, knowing how to take a screenshot on Mac is super easy! You just need to know which buttons to push. Similarly, a lot of people also question how to delete screenshots on Macbook. Well, for this, you just need to know where your screenshots are getting saved, and you are good to go.
Screenshots are a great way to show your screen or particular information to one of your contacts, which cannot be directly saved into your phone or computer. However, how to take a screenshot on Mac might become a concern if you are new to the Apple World. But fret not! In this article, I will tell you the basics of screenshots and how to delete screenshots on Macbook, but first, it becomes imperative to know how to take Screenshots on Mac.
Quick view
How To Screenshot On Mac?
Taking a screenshot on windows and android based computers is super easy, but a lot of us wish to know how to take a picture on a Mac. If you are sailing in the same boat, you need to follow these steps to get to know how to take a screenshot on a Mac.
How to screenshot on Macbook using keyboard shortcuts
To perform certain activities and system tasks, macOS provides hotkeys. When you use hotkeys, you will notice a substantial increase in the speed with which you do your tasks. Use the following screenshot instructions to take a snapshot of your Mac’s screen:
- Take a screenshot of the entire desktop screen by pressing Shift + Command + 3.
- Take a screenshot of a specific region of your Desktop screen with Shift + Command + 4. This gives you an option to choose the screenshot area.
- Take a screenshot of a specific window on the Desktop using Shift + Command + 4 + Space. On your Mac, you may also use this shortcut to capture a screenshot of a website.
How to screenshot on Mac using Screenshot
If you prefer not to remember keyboard shortcuts and like to accomplish activities using a mouse, you can use Screenshot. The Screenshot app is accessible on macOS and can be discovered in the Launchpad or via Spotlight or utilities. Grab is really easy to use and offers a large number of features.
Here are the most important ones –
As you can see, it’s pretty straightforward. There are four “shooting” modes, each with its own set of shortcuts:
- Selection (Shift + Command + A) to take a screenshot of the selected area.
- Window (Shift + Command + W) to take a screenshot of any of the currently open windows.
- Screen (Command + Z) to take an entire desktop screenshot.
- Timed Screen (Shift + Command + Z) to take a screenshot of the full-screen timer.
- After taking a screenshot, the image will appear in the Grab window. Then you can save it in the appropriate location.
It’s also worth noting that the Screenshot App may display many screenshots; you can snap multiple screenshots and compare them to find the best one. By pressing Command + C, you can copy your photos to the clipboard.
The screenshot application is easily accessible and can be found by hitting the finder and typing in screenshots.

Once you do this, something like this will appear at the bottom of the screen-

There you go! This is how easy it is to take a screenshot on Mac. I hope now you know how to take a screenshot on a Mac. If that’s the case, the next step would be to know where these images get saved.
Where Do The Screenshots Get Save?
Screenshots are saved to your Mac’s desktop by default. If you plan to capture many screenshots, you should probably clean those up and organize them in a folder or delete them if you don’t need them. If you snap many identical images, your file names will include the date and time you took them, making it a little simpler to discover the right one.
Now that you are all about screenshots on Mac, and specifically, you are well-versed with how to take Screenshots on Mac, it’s time for you to know how to delete screenshots on Macbook.
How To Delete Screenshots On Macbook?
The screenshot files may take up more than 1 MB of memory. Even if each file is only a few megabytes in size, it can quickly fill up your hard drive. As a result, it is preferable to erase them from your Mac regularly. It’s also tough to find and erase screenshots when they’re saved in numerous places. As a result, we recommend utilizing the Cleaner-App software program to erase screenshots from your Mac.
Complete the following steps to get rid of useless screenshots:
- Cleaner-App will be launched.
- Select the Screenshots section from the drop-down menu. For your convenience, sort files by size, name, or date. Select a few files that aren’t needed or click Select All. Then select Review and Remove from the drop-down menu.
- Select the files you want to delete and then click Remove.
- To free up space on your Mac, empty the trash can.
How to delete screenshots on Macbook permanently from the bin?
Once deleted from the main file folder, these screenshots move to the bin. It is super simple to permanently delete them from the bin as well. This will ensure that these screenshots are permanently deleted from your Macbook.
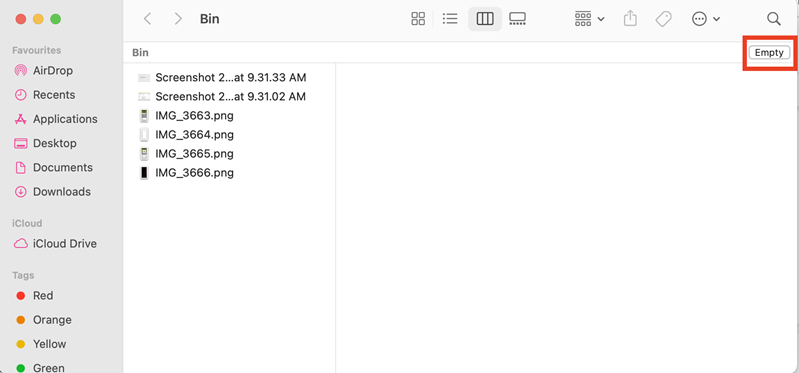
- Click the Trash icon in the Dock on your Mac.

- This opens the trash bin on your computer. Here, click the Empty Bin option to clear your bin and delete the files permanently.
Conclusion
Once you take a screenshot, iOS gives you plenty of options to edit, crop, rotate, add text and much more. Therefore, knowing how to screenshot on Macbook and how to delete screenshots on Macbook might look puzzling at first, but the truth is, it is extremely simple and useful once you get to know which buttons to hit.